


|
|

File Uploads Function
The file uploads function is accessed via a link above the Facilitator Main Screen as specified above.To upload a file to the FacilitatePro server1. Click on the File Uploads link above the Facilitator Main Screen. The File Upload window opens.2. Click on the Browse button to browse to the file you want to upload.3. Enter subdirectories if appropriate and the file name and extension as shown in the screen shot below. Subdirectories are automatically created if they do not yet exist on the server. The file name may be changed but the file extension must match the original file.4. Click on the Upload button.The file will be uploaded to the server and placed within the Web directory and within subdirectories defined with the facilitator's user profile and during the upload process. A confirmation screen will display providing a link and the HTML code to access the newly uploaded file or file.Click on the Download File Link to test the uploaded file.Copy the HTML code for this link to incorporate it into a custom screen template or custom survey header. Edit the Download File Link label to something that is appropriate to your custom screen.NOTE: Avoid errors by ensuring that the original file has no spaces in the file name. Prohibited file types may not be uploaded.
 File Upload screen accessed from link in Facilitator Toolbar
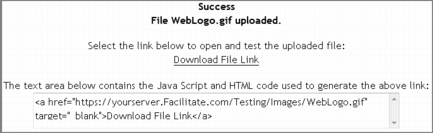 File upload confirmation screen
|
Facilitate.com, Inc. Copyright 1992 - 2011, Facilitate.com, Inc. All Rights Reserved www.facilitate.com Voice: (805) 682-6939 support@facilitate.com |
|
|